Showing posts with label Prismacolor. Show all posts

Monday, February 28, 2011

The Sketchbook Challenge: {Opposites}

Squeezing in a new art journal page prompted by February's theme (before February is over at midnight tonight...already?!), Opposites, at The Sketchbook Challenge!

Initially, I was unsure what direction I would go with this theme. Yes, there are a lot of options, but nothing spoke to me. Then, earlier this month, I got a migraine from Hades.

The Sketchbook Challenge - Opposites

And with it, came something that I had never experienced before, an aura.  Scared the bleepers out of me!

The progression from everything being just fine & dandy, to altered sight, to loss of peripheral vision seemed as opposite as could be to me....and something I really wanted to translate with my hands.

I started with one paragraph of an email I zipped off to my Four Musketeers the next morning about what happened, copied and pasted over and over, printed onto cardstock and cut to create three columns.

The far left is left completely untouched.

Art Journal Page

For the middle column, I used colored pencils, spica glitter pens, pearlescent paint, and dimensional adhesive...a lot of dimensional adhesive! (It is always sooo hard not to touch that liquid pool while it dries!)

And on the right I used Distress Inks to show the darkness that followed that wonky wacky aura.

Migraine

The light was reflecting off the dimensional adhesive, regardless of turning the flash off and moving it out of direct light (artificial or natural), but I did my best! :>

Not only was it fun to get the creative on, but it helped to put something that scared me and felt so intangible down on paper and into my art journal.  Thankfully, there has not been a migraine with aura repeat and I would very much love that to be a one time only experience!


Thanks so much for stopping in!  Have you gotten your creative on?  What were you up to over the weekend?

Linking up!
Photobucket

Friday, October 30, 2009

Have a Hauntingly Happy Halloween!!

With mere minutes before Halloween begins (although, if you check your friends emails, Facebook status updates, or are there yourself, you'd think tonight was Halloween for the sheer number of Halloween parties occuring!), I thought I would share a Halloween card of my own.

Now, since I have a mighty innocent Halloween on my agenda, here's my confession for the holiday.....this card is not from this season. I made it way, way, way back in 2007. But, I did get inspired by the rockin' blogger and creator, Taylor Vanbruggen at Taylored Expressions!! Thanks, Taylor!!

After digging around her blog a bit, I found the original post (scroll down to the second post) that I was inspired by. You know something strikes a cord in you when you remember it over two years later! :> And I knew I had the perfect stamps to CASE her creation with. I used my ooo-llll-dddd All Night Media stamps from back in my early stamping days of the mid-'90's and my Vintage Label stamp from Purple Onion Designs that I love as much today as I did when I bought it then!!

So, you are probably wondering, why two pics of the same thing, same angle, etc.??? Right??? Back in 2007, you know, waaaaayyyy back when, I wasn't worried about taking pics for blogging or anything other than remembering what I made. And since my son and I were arguing, debating, conversing, contemplating, and disagreeing on which pic to use, I put both up. He thought it was a "Before" & "After" shot, simply because the windows 'lighting' (colored in with Prismacolor colored pencils) was so much...more in the second pic. As he put it, "See!! The lights are on in this one and they aren't in that one. Its a "Before and After" shot!!" I haven't made him watch too much HGTV, I swear!!!

Hope tomorrow is Spooktacular for anyone celebrating Halloween and if you are not, well, then I hope your day is simply fabulous!!!!! If you are getting your spooky groove on, what ghosts and goblins, or fairy princesses are gracing your door?

Sunday, October 25, 2009

Home is where the heart is....

Hello there! Long time no see, huh?! I have been running around like that proverbial chicken.....still! There was lots of company last month, a kidlet birthday that actually stretched three weeks into this month, a four day scrapbook retreat which takes a couple of days to pack for, two or three times that to unpack (I write this as we are still tripping over my dozen plus bags in our entry way), and a couple of weeks to recover from the uber late nights! We also had the usuals, school, homework, art projects, games, playdates, and the typical daily stuff. And one of my best friends unexpectedly lost her father.

I've been in shock since receiving the news and can only imagine her and her mother's grief. They were an extremely tight family and loved each other so much. We said good-bye to this wonderful man on Friday night. My friend asked us to hug our loved ones and enjoy them for whatever time we do have with them. She also asked and hoped that whatever we learned from her father, we take out into the rest of our worlds. He was an optimist, a problem solver, warm, loving, and opened his home and heart so willingly. And his whole family makes me smile!

Hmmmmm..........I suppose I've surprised myself as this is not where I was going to go with this post. But, because I think so much of this man and his wife and daughter, my friend, I am going to leave this in here.

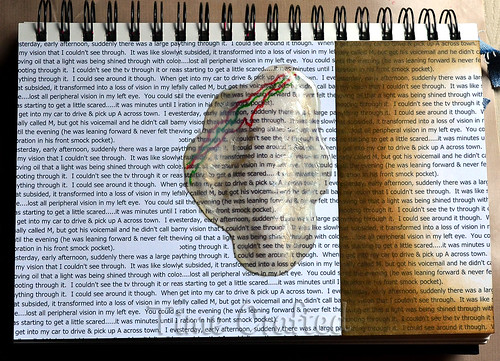
And just so you do not think I have completely abandoned creative pursuits, including card making, I'll share a card with you as well. There are four of us best friends and I made this card for another gal in this group, my best friend that I met over twenty years ago.

My apologies for the shadows. I did not realize they were so strong when I took the pic and I have already given her the card and cannot retake the pic. I stamped images from PTI's Boards & Beams. The small topiary trees, I colored with 
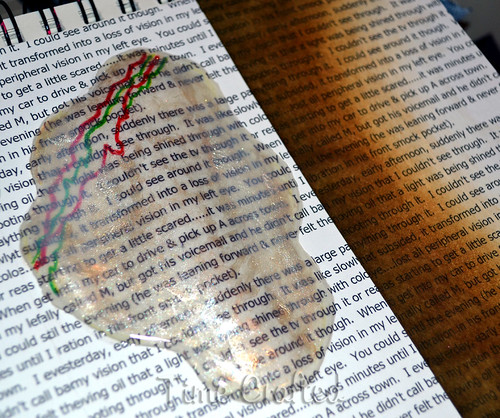
Prismacolor colored pencils and then cut out with a craft knife. I stamped the house twice and cut the windows out on one of the images with a craft knife as well. I then layered the cut house on top of the uncut house with foam tape for depth. I wanted you to be able to look inside the windows. And as I have discovered many times now, I seem to like the graphic look of stamped images uncolored.

Here you can see those layers a bit better. I layered all of the pieces on a Kraft base, stamped the first half of the sentiment on the bottom, and added a Sweet Blush satin bow. On the inside, I stamped and punched out a heart from PTI's Heart Prints and stamped the othe half of the sentiment from Boards & Beams.


I chose to share this card today because the sentiment rings so true. My friend's parents built their last two homes and chose every detail, but it was the people inside that made them homes that they relished being in.

My own home definitely needs updates, new carpet, a redone kitchen, and some pruning in our yards. But, it is my family that lives inside these walls with me that warms my heart, makes me smile, share hugs with, laughter, and even tears that make my life what it is. And today, I am choosing to smile as football is on the tube, my daughter playing in imagination land under the dining table, my son yelling out at the top of his lungs for every touchdown, Hubby enjoying his first real down time day in over two weeks, and me, in the middle of all of them and finally checking back in with all of you! :> What are you smiling about today?

Supplies:
Cardstock: Stampers Select White, Kraft - Papertrey Ink
Ink: Onyx, Sepia - Versafine
Stamps: Heart Prints, Boards & Beams - Papertrey Ink
Ribbon: Sweet Blush Satin - Papertrey Ink
Punch: Small heart - EK Success (from PTI)
Other: Craft knife & Prismacolor Colored Pencils

Wednesday, August 12, 2009

Who says a card has to Open?!

Not me!! I've been thinking about it and a Postcard is simply a card that is posted through the mail without an envelope and does not open. So, I do not think it is definitively necessary for a card that does travel by envelope to have to open. That's my story and I'm stickin' to it!

Quite some time ago, I colored in this Knitabella from Stamping Bella with Prismacolor markers and colored pencils. Do not ask me about the colors I chose because not only can I not remember, but I'm not even sure why I would have chosen these particular colors. I do, however, suspect that I colored her in for a color challenge for which the deadline passed and never finished her up. Well, I just could not have a colored in image haunting me anymore!

Initially, I thought I would detail cut her out, but then went this route. I used my handy dandy Coluzzle (I have the EK Success circle cutter and a Cricut, but I must say, I do love just how fast and easy it is to pull out my trusty Coluzzle.....why, oh why, did Provo Craft discontinue it?!) and cut her into a circle and then matted her with some Raspberry Fizz. Here is where I say, that if I had some of those beautiful Nesties, I would most definitely have used them. But, I don't, so I went with what I do have. And here is where I tell you that this card does Not open!! I matted the Fizz circle onto the next size up circle in Lemon Tart and cut one more Fizz circle in the same size as the first one and adhered that to the back of the Lemon Tart to write on. A flat, non-opening card!

Would you like to know my reasoning? Hmmmm? Ooo, well since we'd be diving further into this brain o' mine....maybe not. Oh what the hey, I promise we won't go deep at all! So, when I cut her into a circle, I realized she just didn't look right on a rectangular card, or a square one for that matter. I thought about putting her on a circle Open-able (okay, so its not a word, but it came out of my head and typed its way on my keyboard....so I'm stickin' to it!) card, but that just wasn't sitting right with me and that's when I started thinking about what it means to be a flat, non-opening Postcard. Both my Mom and my Hubby quite often let out rather large pointed sighs at my 'ability' (let's just call it that, shall we? thank you!) to argue semantics and after having this argument in my head....with myself, guess what?! I won!

Add a little hand stitched "hi" and voila! A flat, non-opening, circle card to pop into the mail to......none other than my knitting Mom! Since Knitabella was already colored (again, why in those colors, I cannot say!) and there is not much to this (other than a linguistic argument with myself), she took no time at all!

My Monkeyman has a birthday party to go to late this afternoon with lots of kids and water balloons, one that he is so excited to attend that he woke me up an hour and a half early this morning. A wee bit excited?! Now, how much do you want to bet that all of us adults will end up wet too?? I hope you are having a wonderful Wednesday and that you find a little time to play. :>

Sunday, June 21, 2009

KWerner Color Inspiration #55...my 1st time playing along!

Amazingly, I have never played along with one of Kristina's color challenges before. But, that ended today. I have a couple of new books by my bedside and I am so tired of pulling the nearest thing to mark my page....a paper clip, a barrette, and my old standby, a kleenex! So, a bookmark seemed to be calling my name.

With Kristina's colors in mind, I riffled through my stamps and pulled out quite an assortment that have most definitely not received the love they deserve. First, I cut a piece of More Mustard down to size. Next, I stamped an antique map of Africa. Then, I stamped the sentiment and the Tim Holtz clock with Versamark and embossed with russet embossing powder. I stamped some vines randomly all over the cardstock (these were not embossed) for a tone on tone effect.

Not wanting to add any cream cardstock to the bookmark, I went through my options to include the color. Cream ink? Nope, don't have it. Cream rub-ons? Nope, none in a shape that would work for me. Hmmmmmmm.......what else do I have?? Then it came to me!! Prismacolor colored pencils!!! PC914, Cream, at my service! I know this seems so simple, but its a major light bulb tip moment for me!!! With my pencils, I pretty much have any color that could be used in a color challenge, even if I do not have it in ink, cardstock, or ribbon! I used the cream colored pencil to color the edges, as you would ink the edges with an ink pad. This light bulb moment just tickled me oh so pink....er, um, cream colored?!

I finished the bookmark off with a Making Memories pebble clip at the top and matted the stamped More Mustard carstock on to a piece of Really Rust cardstock. One thing I want to note, I know that the embossing powder looks a bit different in color to the cardstock, but they really are the same color in real life.

I typically do not collage stamp. Yet, I had so much fun here and really like how it came out.....not to mention, all of the unused stamps and supplies that are feelin' the love with this simple little creation! :>

Supplies:
Cardstock: More Mustard, Really Rust - Stampin' Up!
Ink: Versamark - Tsukineko; Weathered Wood Distress Ink - Ranger
Stamps: Antique Maps - Sunday International; Decorative Flair (vine) - Stamped In Ink; Sentiment, Special Occasions - Marcella by K&Company; Clock, Life's Possibilities - Tim Holtz for Stampers Anonymous
Embossing Powder: Russet - The Herbarium
Embellishment: Travel Pebble Clips

Other: Prismacolor Colored Pencil

Monday, April 13, 2009

Eggs! Eggs! Eggs!!

Dyed eggs, plastic eggs, and of course, some Easter egg shaped cards for my kidlets!


You would never believe where I got the inspiration for these cards! A piece of cardboard, the packaging from a potty training Disney Princess toilet insert (you know, the kind so that little tushes don't fall in :>), was just about to make its way to the recycling bin when I turned my head to the side and saw it....the perfect egg shape to make a card with!

I cannot freehand cut shapes out, but by tracing the inside 'egg' onto cardstock, I was able to make egg shaped cards! A little Tip....if hand cutting layers is troublesome for you, put a little bit of removable adhesive in between the layers (I used a Hermafix Dotto that just rubs off) and then cut them out.

These both are very simple cards, but I had fun putting them together and enjoyed the smiles on the kids' faces when they got to see them completed on Sunday morning. And because they know Mama's supplies so well, the cards were from Mom and Dad and not the big Bunny! :>

For my son's I cut circles with my Coluzzle from PTI's Bitty Dot paper. At first I layered the circle evenly, but later moved them off center. Looking at it now, I realize it kind of looks like a bunch of eggs.....while it works with the theme, it definitely was not my intention! He loves bunnies, so it was an easy pick to grab this oldie but goody out of the stamp stash. (The block, rubber, and foam all look like PSX, but it isn't marked.) I punched holes on the side and laced it up to put the front and back together.

For my daughter's, I tied each set of holes individually for a series of lilac bows. The rest of her card is simple as well....more Bitty Dot papers, flowers, Dew Drops, and some Pearl Ex interference, violet, for sparkle.


Supplies:

Cardstock: Blue & Pink eggs - Pacon (inexpensive Costco pack from a few years ago); Vintage Cream - PTI
Patterned Papers: Bitty Dot - PTI
Stamps: Bunny - Unknown (maybe PSX??)
Ink: Close to Cocoa - SU
Ribbon: Blue - Offray; Light Orchid - SU
Flowers: Prima
Bling: Orchid Dew Drops - Robin's Nest; Violet Interference Pearl Ex - Jacquard for SU; Pink Spica pen - Copic

Saturday, March 7, 2009

Cupcake PlayDays

I've been in a daze of cupcakes, sprinkles, frosting, and fun these days. No, there aren't any great smells wafting in from the kitchen, more like the paper, ink, markers, and Crystal Effects kind! I wanted to make a birthday card and knew I wanted to use the one and only cupcake set that I own. I made several cupcakes using both markers and alcohol inks. What I am sharing today is a card made with a cupcake using Bic Mark-It Permanent Markers and Prismacolor Markers. Hopefully, the alcohol inked ones will make it to paper soon.

I stamped the cupcake, colored the frosting with the Bic markers and the wrapper with a Prismacolor marker. But, my cupcake was in serious need of some sprinkles! Not happy with any of the embellishment options I already had (bling, dew drops, brads, etc.), I opted to color some white cardstock with both kids of markers, punch them out with a hole punch, and then add Crystal Effects to the top of them....super easy! By far, the most difficult part was not touching them and waiting for them to dry! I also did not have the right shade of yellow cardstock to stamp the "Happy Birthday" sentiment on, so I again colored white cardstock with the same yellow marker I used to color the frosting, stamped the sentiment, and trimmed it out....voila! matching yellow cardstock! I had so much fun making my sprinkles and more than half of them did survive the drying process (and my impatience AND curious kidlet fingers!). I am so excited that I can make these little embellies in any color that I have a marker for!


Supplies:
Stamps: Inkspirations (no longer in business) - cupcake & sentiment; Papertrey Ink - Polka Dot Basics
Cardstock: Papertrey Ink - Stampers Select White & Pure Poppy; SU! - Pacific Point
Patterned Paper: Yellow w/polkas - stash (from about eight years ago...no wonder I hold onto stuff!)

Ink: Versamark, Versafine - Onyx Black, Bic Mark-It & Prismacolor Markers
Other: Ribbon - stash (from a great swap), SU! - Crystal Effects, foam squares - Target $ Spot
Blog Widget by LinkWithin